

Set up Infrastructure mode for VOCOM Tough
Equipment
- A VOCOM II Tough – new or recently reset (for information, see Reset configuration).
- A computer with VOCOM II driver version 4.5.0 or newer installed.
Instructions – set up wireless infrastructure mode

- Diagnostic connector
- ECTA-26/OBD cable
- VOCOM II Tough
- Wi-Fi network
- Router
- Internet access
- Internet/Central System
- Windows computer
- Install and open the VOCOM II configurator application on your computer.
- Connect the VOCOM II Tough to the OBD Diagnostic connector of the vehicle using the ECTA-26/OBD cable.
- Connect to the VOCOM II Tough using the access point mode since it is the default mode of operation. This is done only for the first-time configuration. Otherwise, connect the VOCOM II via ECTA-12/USB cable to the computer. Instructions to connect the VOCOM II Tough to the computer using access point mode can be found in set up Wi-Fi access point mode for VOCOM II Tough.
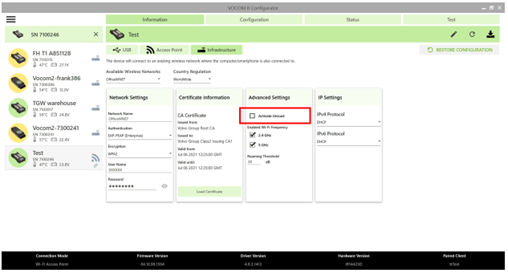
- Select the VOCOM II device in the configurator application. Click on Configuration > Infrastructure.
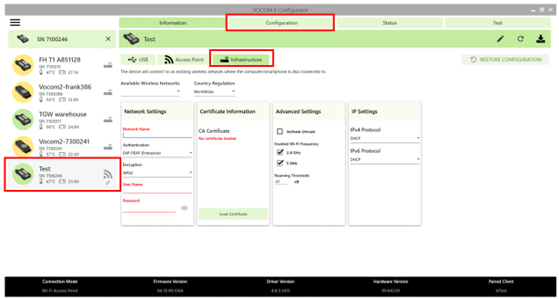
- Select the available wireless networks from the dropdown. Or, enter the network name manually (make sure to connect your computer to the same wireless network that you would want the VOCOM II Tough to be connected to).
Note: An open network (without password protection) cannot be used to configure the VOCOM for security purposes.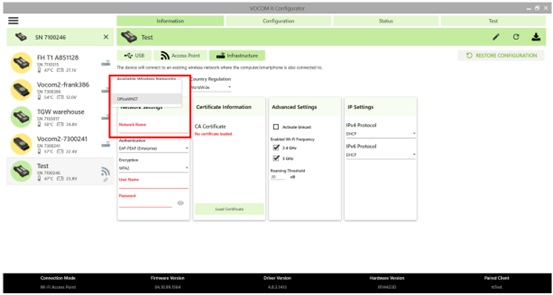
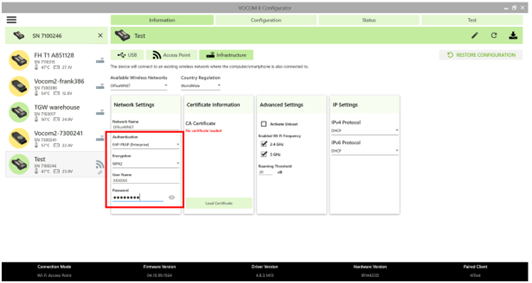
- Choose appropriate Authentication according to your network. For example, EAP-PEAP type authentication will require you to enter the login credentials for the selected network (Username and Password) based on network details from the IT team. Choosing a pre-shared key, for example, will require you to enter only the password that the network provider has shared.
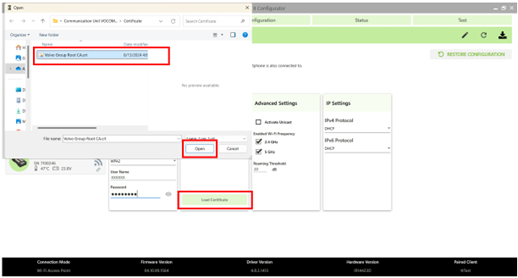
- Click on the Load Certificate button. Choose a CA Certificate and load it. Read more about certificates/authentication in authentication types in infrastructure mode.
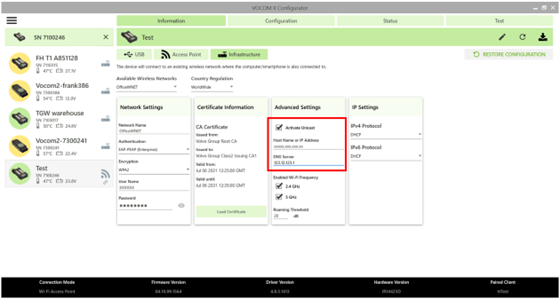
- Click on the activate unicast button for the VOCOM II device to be discoverable only by your computer.
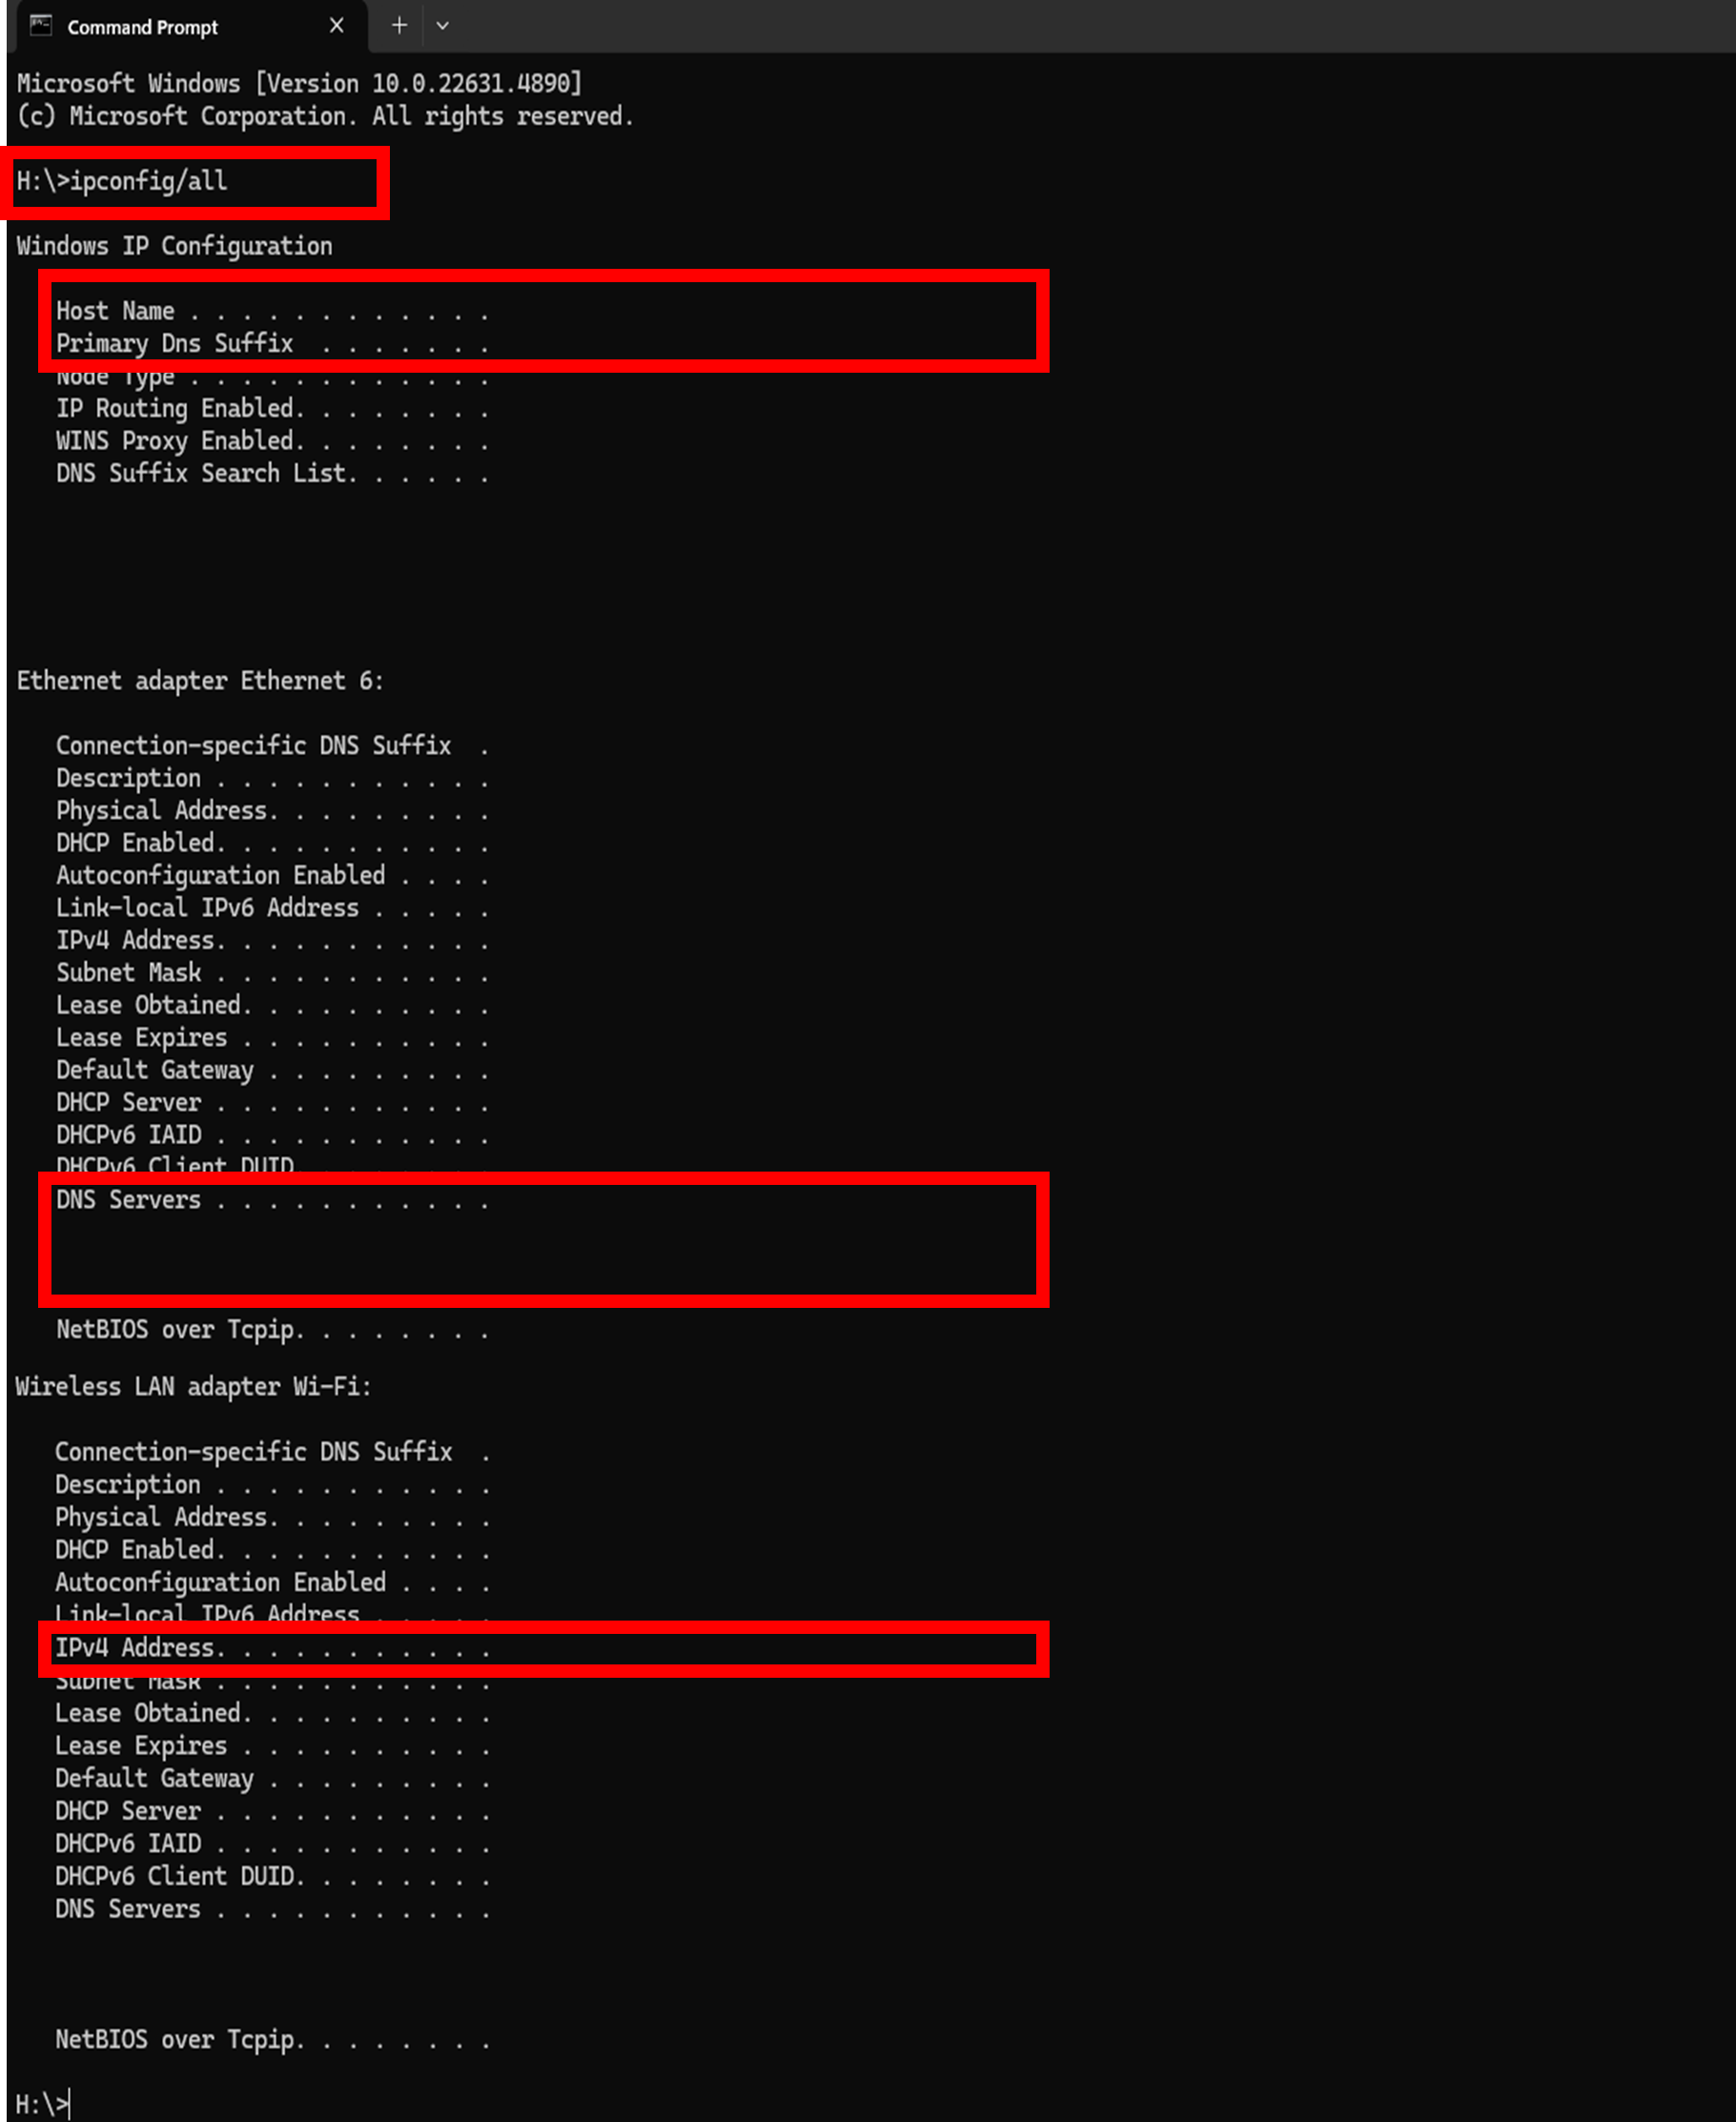
- Ensure that the Hostname and DNS Server are correct. This data is automatically fetched and filled by the configurator application. The details are specific to the network provider, so it is advisable to always check.
- To check the details, you could use the Windows > command prompt > type “ipconfig/all” and get the information.
- Click on the save icon and then click the restart icon. If the USB/ECTA-12 cable was used, then remove it from the computer after the VOCOM has restarted.
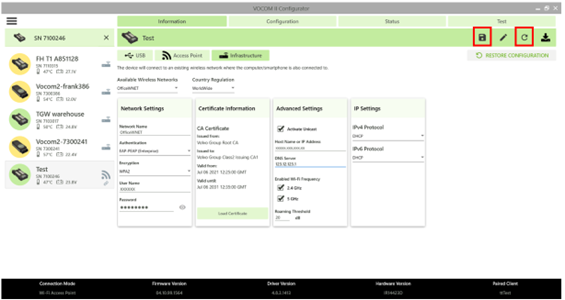
- Your computer is now connected to the VOCOM II Tough in the infrastructure mode via the Wi-Fi network. Therefore, you now have access to the Internet as well. Look for the indicators marked in red to confirm that the VOCOM is in infrastructure mode.
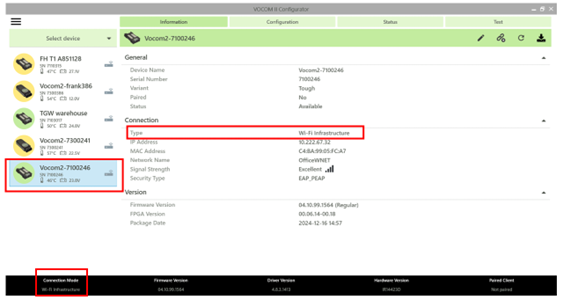
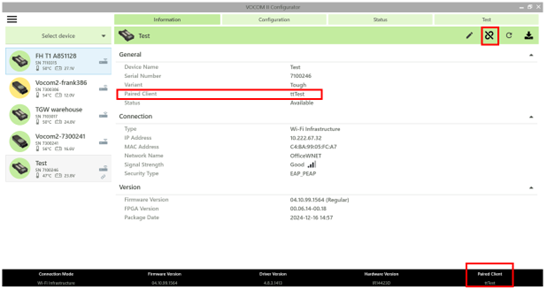
- Make sure the VOCOM is paired to your computer after restarting. Otherwise, click on the pair button for pairing to happen.
Available wireless networks
- This is the list of available networks to be used for Infrastructure configuration, it will list the networks seen by your computer and not the VOCOM II device. Hence, ensure that your computer is in the range of the desired network. You can check that by opening the available wireless network from Windows.
- If you are not in the range of the desired network or have any other issue finding the network, you can manually type in the Network Name field under the Network Settings section.
Authentication
For more information and instructions on authentication, read authentication types in infrastructure mode.
Encryption
- VOCOM II supports the WPA and WPA2 encryption methods for wireless privacy. Note that firmware 4.11 and above support only WPA2 encryption in accordance with the RED regulations.
- Encryption WPA2 is selected by default and should work in most cases, but you can change to WPA + WPA2 if you still use the old WPA encryption standard.
- Note: WEP is not supported by VOCOM II due to cyber security policy.
- WPA2 is the recommended encryption mode for improved security and performance. It is recommended to avoid using WPA encryption for security purposes.
- WPA+WPA2 is a compatibility mode, with automatic selection of the encryption method.
- If your Access Point is configured for WPA only, performance and security will be significantly lower than with WPA2.
Country Regulation
- The use of radio channels for 2.4 GHz and 5 GHz (Wi-Fi channels) is regulated and differs among countries regarding the set of allowed radio channels and maximum transmission power.
- The default configuration is “WorldWide” which can be used globally.
- You can change this setting to your country of operation but this is an optional setting.
Activate unicast
- Use this option in case your network does not allow multicast packets.
- You can use the computer hostname or the IP address.
- For hostname usage, the DNS server is also required.
- With unicast activated, the VOCOM II device will only be visible to that specific computer.
Enabled Wi-Fi frequency
- Use this option if you know which frequency band your network is on.
- This will allow the VOCOM II device to scan and connect to that frequency band only.
- Note: The wrong setting can cause the device to not find the configured network.
Roaming threshold
- Use this option to fine-tune the device roaming in case your environment has many different access points and the VOCOM II device moves across the area. Otherwise, this setting is unnecessary.
- The value is the lower signal-to-noise ratio (SNR) limit that the device must try to roam and is expressed in dB.
IP settings
- Use this option to change the VOCOM II device IP assignment, it supports the following IP address assignment methods:
| Assignment method | Description |
|---|---|
| DHCP | Use a dynamically assigned IP address from the network’s DHCP server. |
| Use IP address | Manually set a static IP address. |
| APIPA | Obtain a unique, link-local IP address using a Zeroconf algorithm. |